

Zoom more features for you to explore
For those already familiar with the basic Zoom functions this cheat sheet will explore some tools and settings you can use for your teaching for more advanced use.
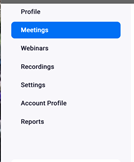
Firstly, it is important to understand that certain features (like polls, virtual background, file sharing, etc.) need to be enabled in the “Settings” of the Zoom account. Therefore, the first thing to do is to go to the “settings” link in your Zoom account (see image below)
click on the settings and check that tools like polls, virtual background, sharing files, etc. are all switched on.
Polls – once you have enabled this in your Zoom account settings Polls can be created in your particular Zoom meeting. Once you have set up your Zoom meeting navigate to the bottom of the page and you will see a button that will allow you to add a poll. It is a good idea to have polls created ahead of time so that you have a chance to test them out before your session. Once students have completed a poll in a live session you can always retrieve the poll results after the session is finished by clicking on the “reports” link (you can also see in the image above).
Breakout rooms – these can be very useful to get your students in active participation by dividing them in groups and assigning some tasks to do as a group. These can be discussions, working on sharable activities like Padlet walls, or collaborative documents, etc. Break out rooms can be created automatically during the session, manually or for large cohort pre-prepared ahead of session by using the “Breakout Room pre-assign” feature in your meeting set up page (see link in the resources to learn how to do this). Once your students are in the breakout room you can use communication tools like “broadcast to rooms” to keep the pace going or you can simply “visit” each room by joining the breakout rooms one at the time.
One important tip is to ensure that students have clear instruction on what they will do in the room and how long they will be there for as it easy for them (and you) to get distracted or not being on task. Have something concrete that once back in the main room can show what they have achieved in the breakout room (the Padlet they contributed in, a copy of the chat they used, or simply a verbal report). Breakout rooms work best for medium to long activities (at least 10 minutes long) or by the time the group organize itself and get stuck into the activity the time is over.
Sharing resources – The chat is so much more than just a communication tool, it allows you to paste in links to online activities (like Padlet, sharable documents, etc), videos, etc. It also allows you to share files but you must have the file share enables (in settings) in order to do that. If you record the session (manually or automatically) the chat also gets recorded and you will find a text file with the recordings in your Zoom folder. It is a good idea to teach your students how to save the chat (especially if working in breakout rooms) as only the chat from the main room will be saved automatically. One tip is to have anything you going to share in the chat (like links for example) ready in a document so all you have to do is copy and paste and not waste time looking for things. Also another important tip is to wait that you have all your students in the meeting before you paste links or communicate in the chat as anyone joining late will not see what you have posted earlier on, so is good to be prepared but not to have things already in the chat before class begins as students will not see it and you will have to do it again.
Links and resources to help you
Breakout rooms
Pre-assigning participants
Managing Breakout rooms
Polls
Using Polls
Tips and tricks
As usual any questions, tips or ideas you would like to discuss with our team to make the best of your Zoom just get in touch. education.cass@anu.edu.au
Happy Teaching
Grazia